Showing posts with label Windlass. Show all posts

Sunday, August 29, 2010

Anchor Chain Marking

By popular demand, here is the anchor chain marking system that we use on Bella Star.  If you ask 10 people what marking system they use, you’ll probably get 10 different answers.  We wanted something visual, simple and void of complicated math (like some of the systems out there), so we came up with this:DSC_1131

Here’s the pattern:
Red = 25’
Yellow = 50’
Green = 75’
Blue = 100’
Black = 100’ + (length of the other color)

Let’s say you see black and another color on the chain.  The amount of chain would equal 100’ plus the length of the other color.  So if red equals 25’, then “red, black, red” would equal 125’.  “Yellow, black, yellow” would equal 150’ and so forth. For lengths over 200’, just use two black markers.

It’s true that the gypsy has been known to eat zip ties, but we put multiple ties per link and go over the chain once a year or so to replace any missing ties.  DSC_1133“Red, red, red”  = 25’
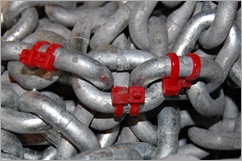
If you’re fancy, you could always mount a digital chain counter on your windlass, but where’s the fun in that?  They also sell markers that fit in between the links, but zip ties are waaay cheaper.

Wednesday, April 8, 2009

Windlass Rebuild

Bella Star has a Muir Hercules HM1200 manual windlass manufactured in 1984. I quickly noticed after taking delivery of the boat that the chain gypsy would turn clockwise to pull the chain up, but even with the brake completely released it would not turn the other way to let the chain down. I figured I had to be missing something simple, but couldn't figure it out.

One day Nicole and I were on the foredeck monkeying around with it and one of the guys from the yacht brokerage stopped by and chatted us up. We told him what the problem was and it turns out he used to sell them back in the 80s. I thought for sure he'd know what the deal was, but he couldn't figure it out either. One of the first projects that I took on when we got the boat was regreasing the primary winches. As far as boat projects go, it was pretty straightforward, and I was able to do a complete rebuild on both the winches. The case looked like it could use some fresh paint, and I figured a windlass was basically just a winch so I took it off the boat and brought it home for my next rebuild project. The winches were much easier. I was only about an hour into taking it apart when I got that "this wasn't a very good idea" feeling, but I was committed.


About half way through taking it apart I discovered why the gypsy wouldn't let chain out. There is a part called an O cone that fits into the gypsy. As you tighten the clutch nut against the gypsy, it acts as a brake. The O cone had simply gotten stuck to the gypsy since it hadn't been used in a while. All I really needed to do was knock the O cone off the gypsy with a hammer and put some grease on it.

Instead I was well on my way to rebuilding the windlass. Once I had it all taken apart I was pretty alarmed at the number of gears and the pile of parts I had created. I degreased all the gears, keys, washers, pawls, shaft idlers, and doohickeys and set them aside. My first task was to strip the paint on the case.

I like soy. We enjoy soy hotdogs, soy sausage, soy burgers, and edamame. So I naturally thought that a soy-based paint stripper would work well for stripping the paint. It's much more environmentally friendly and has less odor. Results? It just made a mess. For a stripping job like this, go with vicious cancer-causing chemicals and leave the soy for fake meat. I got my hands on some commercial-grade paint stripper made for airplanes and that did the trick. After doing plenty of research on proper aluminum painting techniques I got some acid etching primer and completed the painting.

The aluminum cover on the bottom of the case looked to have suffered some corrosion and was not suitable to use again. I sent an email to Muir to see if there was anywhere I could still get the part. They said that I would have to have one fabricated.

If you ever need pretty much any kind of metal cut to your specifications and shipped to you, checkout http://www.onlinemetals.com/. They're over in Ballard and offer will-call pickup as well. I chose the highest grade aluminum they had, chose the thickness and gave them my measurements. With shipping it was about 10 bucks and the fit was perfect. I used a grinding wheel, compliments of my father-in-law, to grind the corners off, drilled the screw holes, and it was ready to go.

The hard part was reassembly. The three main gears were attached to shafts and could only go in the case one way. My problem was with the spring-linked gears that were not attached to a shaft. Since they just kind of fell out of the case when I was taking it apart, I wasn't sure how they fit in. I didn’t have a manual for the windlass, so I emailed the nice folks at Muir down in Australia and they promptly sent me a PDF. At first glance I thought it was a schematic for a time machine. It didn’t really spell out for me how the gears were supposed to go, so I laid them out and sent them this:


In my mind it looked more like this


A sales guy named Jason Page at Muir checked with some guys in the workshop and pointed out that I did not have the spring loaded gears in the correct position. So with the proper positioning figured out, I put everything back together and had ZERO parts left over. Success!


Saturday, March 28, 2009

V is for Victory

For those of you familiar with our windlass saga, you'll be pleased to know that Aaron was victorious! He'll be by to give the play-by-play soon. Aaron 1 - Windlass 0